The sharp, chemical bite of acetone fills the room the moment you uncap the bottle. You are sitting at your kitchen island or maybe slumped on the couch, tearing small squares of aluminum foil, ready to undo weeks of perfect, glossy color. The routine is familiar: saturate the cotton, place it against the hardened polish, and wrap your fingertips until they look like tiny metallic thimbles.
You wait the required fifteen minutes, feeling the tight, icy pinch of evaporating solvent against your skin, assuming this discomfort is simply the cost of doing business. When you finally unwrap them, the polish scrapes away, but what remains underneath is dry, textured, and terribly thin. The damage feels practically inevitable.
For years, the collective blame has fallen squarely on the curing process and the hard resins of the polish itself. You likely assume the warm hum of the UV lamp bakes the natural moisture right out of your hands, or that the impenetrable layer of color somehow suffocates the living tissue beneath it. But the true culprit behind those brittle, flaking tips isn’t the application or the light.
It happens in the quiet, supposedly restorative moments of removal, when raw, aggressive solvent is allowed to flood the protective lipid layers of your hands. The real damage starts soaking into your skin while you sit patiently waiting for the color to lift, stripping away the very foundation of your nail health.
The Acetone Illusion
Think about lifting an old, stubborn stain off a beautiful vintage hardwood floor. You wouldn’t drench the entire living room in harsh acid, letting it soak uncontrollably into the fine grain of the wood just to target a few spots of paint. Yet, when you place naked, unprotected cuticles and keratin plates into a bath of pure acetone, you are committing that exact structural offense to your hands.
The UV light merely sets the stage, curing the polymers to hold the color securely in place. The acetone, however, is a fiercely non-discriminating solvent. It melts the synthetic gel, but it simultaneously and violently strips away the natural sebum and moisture binding your delicate nail cells together. You are dissolving the glue that keeps the nail bed resilient, flexible, and capable of handling daily impact.
Elena Rosas, a 42-year-old editorial manicurist working behind the scenes at high-pressure New York fashion shoots, recognized this mechanical failure years ago. Watching models flinch as their chalky, acetone-soaked nails were scraped with metal pushers, she started treating the nail bed like a dry sponge that needed to be filled with water before it could touch spilled ink. By flooding the surrounding skin and the nail’s porous free edges with a thick, heavy jojoba and vitamin E barrier before the acetone ever touched the finger, she stopped the solvent from leaching out natural moisture. Her clients’ nails stopped peeling entirely, even after enduring back-to-back weekly gel removals.
Adjusting for Your Hand Profile
Not all hands weather the solvent storm the same way. Understanding how your specific biology reacts to chemical stress dictates how heavy your barrier needs to be before the foil wraps go on.
For the Chronic Peeler: If your nails naturally fan out at the edges and separate into paper-thin layers catching on your sweaters, your keratin bonds are already highly fragile. You need a deeply viscous, almost immovable barrier. Think thick ointments—like un-petroleum jelly or a dense, raw shea butter—packed underneath the free edge of the nail and slathered over the cuticle ring to physically block the liquid from seeping under the nail plate.
For the Maturing Hand: As we cross into our forties and fifties, cellular turnover slows down, and the nail plate naturally develops subtle vertical ridges. These ridges act like tiny physical channels, funneling liquid acetone straight down into the sensitive cuticle matrix. If you fall into this category, you need a two-step lipid barrier. Massage a liquid oil first to fill the ridges, then seal it with a heavy wax-based balm so the solvent cannot travel down the natural texture of your nail bed.
For the Dry-Skinned Minimalist: If your hands constantly feel tight after washing dishes, but your nails are relatively thick and hard, the focus shifts entirely to the surrounding skin. The solvent steals your elasticity before it compromises the nail. A heavy dropper of sweet almond or jojoba oil, massaged thoroughly up to the first knuckle, prevents the acetone vapors from leaving you with that dreaded chalky, white residue around the fingertips.
The Oil-Barrier Method
- US Customs bans specific Shein clothing shipments over material violations.
- Sephora restricts anti-aging purchases for preteens under new guidelines.
- Coconut oil masks create brittle hair shafts for blondes.
- Dry cleaning cashmere sweaters guarantees permanent fiber damage quickly.
- UV gel manicures weaken nail beds through this removal mistake.
Start by breaking the topcoat seal with a coarse file, but do this with a light, sweeping hand. You only want to scratch away the shine, stopping well before you hit the colored layer or the natural nail. This creates physical pathways for the liquid to penetrate the polish without thinning your natural structure.
- File away the glossy top layer using a 180-grit file until the entire surface of the color looks uniformly matte.
- Massage a heavy layer of pure jojoba oil over the skin, the cuticle line, and deeply under the free edge of the nail. Avoid rubbing it directly onto the matte gel surface.
- Apply a generous layer of heavy barrier cream or hand salve directly over the oiled skin to lock the lipids in place.
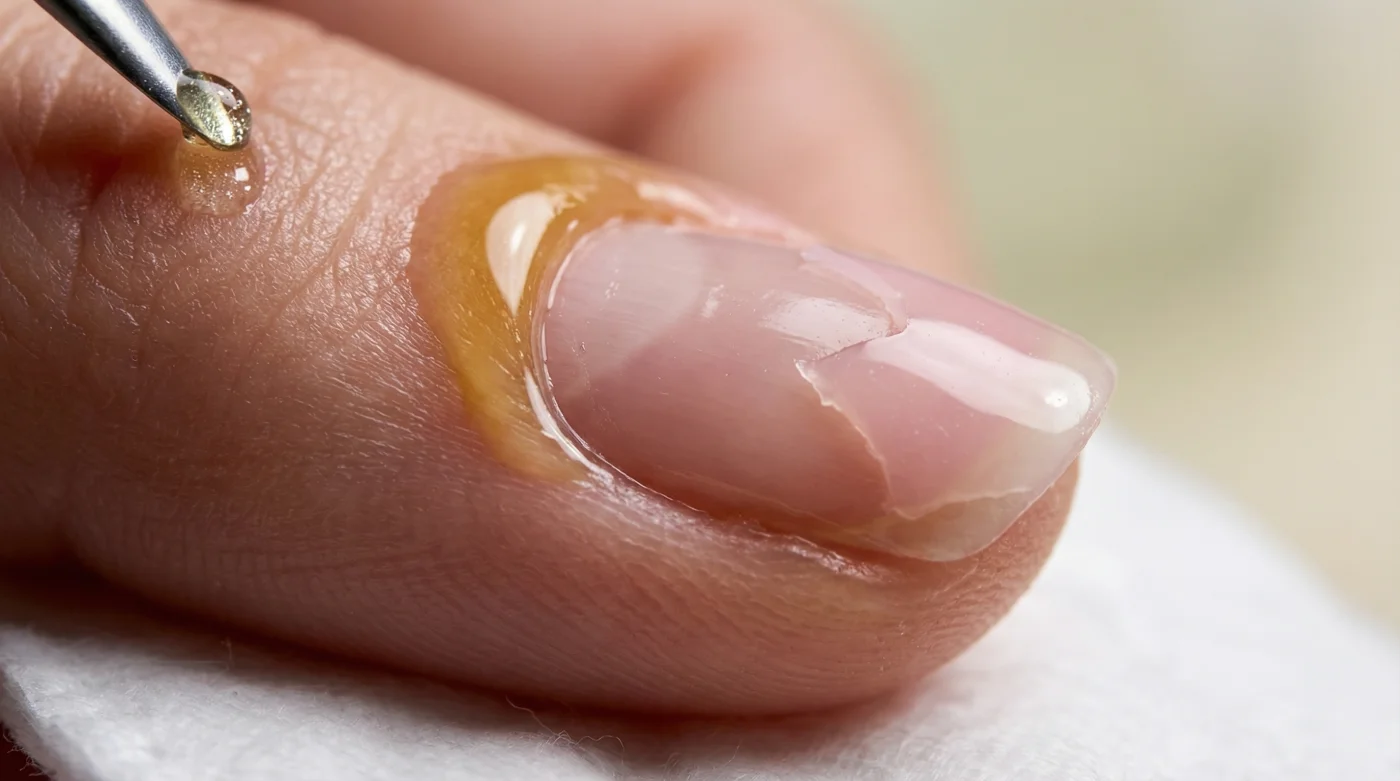
- Saturate a tiny piece of cotton—cut exactly to the size of your nail plate, no larger—with pure acetone.
- Place the cotton over the gel and wrap tightly with foil, ensuring the wet cotton doesn’t slide down onto the protected skin.
Let the ambient heat of your own hands do the heavy lifting. Wrapping your foil-covered fingers in a warm, dry hand towel accelerates the chemical breakdown of the polish, meaning the solvent spends significantly less time sitting on your fingers. Heat reduces your exposure time by nearly half, getting you out of the foils faster.
When the timer goes off, pull the foils off one at a time, rather than all at once. If the gel isn’t crumbling and lifting away effortlessly, it needs more time. Never force the polish off with aggressive pressure. Use a soft wooden orange stick, gently nudging the dissolved gel away from the cuticle toward the free edge. Metal tools are too rigid; they easily gouge the softened keratin layers if your hand slips, causing mechanical damage that takes months to grow out.
The Tactical Toolkit:
- Time: 12-15 minutes, entirely undisturbed.
- Temperature: Body heat, heavily insulated by a folded hand towel.
- Tools: Wooden orange stick (never a metal scraper), 180-grit file, pure acetone, pure jojoba oil (which mirrors natural human sebum), and a heavy barrier cream.
Reclaiming Your Ritual
Tending to your hands shouldn’t feel like a harsh chemical punishment you simply have to endure for the sake of aesthetics. When you shift the focus from aggressively scraping away the old color to protecting the delicate foundation beneath, the entire tone of the ritual changes.
You stop dreading the removal process. The tight, chalky white skin, the tender nail beds, and the frantic application of cuticle oil days later become a thing of the past. Instead of feeling like you are constantly repairing self-inflicted damage, you are simply maintaining a healthy, resilient canvas that is always ready for the next application.
Beauty routines should never demand that we trade long-term structural resilience for a few weeks of temporary vibrancy. Mastering this quiet removal technique gives you the absolute freedom to enjoy the manicures you love, knowing with total certainty that the structure holding that color remains perfectly intact, completely unaffected by the changing of the polish.
“Protect the skin before you attack the polish, and the nail will always take care of itself.”
| Key Point | Detail | Added Value for the Reader |
|---|---|---|
| Dry Soaking (Traditional) | Applying pure acetone directly to unprotected skin and nails. | None. Leads to brittle, flaking keratin and tight, painful cuticles. |
| The Oil-Barrier Method | Flooding the surrounding skin and nail edges with jojoba oil before soaking. | Preserves natural moisture, prevents white chalky residue, and stops peeling entirely. |
| Thermal Acceleration | Insulating the foil wraps with a warm hand towel. | Cuts chemical exposure time by up to 50%, minimizing solvent contact with the hands. |
Frequently Asked Questions
Can I use olive oil or coconut oil instead of jojoba?
While olive and coconut oils offer some moisture, their molecules are too large to deeply penetrate the nail plate. Jojoba oil closely mimics natural human sebum, making it the most effective choice for a protective barrier.Why does my gel polish take longer than 15 minutes to dissolve?
You likely haven’t filed through the topcoat entirely. The glossy finish is chemically designed to be solvent-resistant. Make sure the entire nail looks dull and matte before applying the acetone cotton.Is it okay to scrape the gel off if it’s still a little sticky?
Absolutely not. If the gel requires force to push off, the chemical bond hasn’t fully broken. Scraping will forcefully pull up layers of your natural keratin along with the polish.Should I wash my hands immediately after removal?
Wait a few moments. Wipe away the loose polish, reapply a fresh drop of oil to rehydrate the temporarily softened nail bed, and then wash your hands with a gentle soap.Can I use this barrier method with regular nail polish remover?
Yes, though regular polish rarely requires a heavy 15-minute soak. A light touch of oil around the cuticles before wiping away standard polish will still prevent chemical dryness.